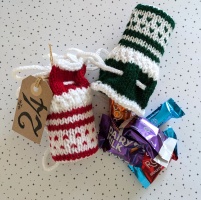
This is a quick pattern for a mini Christmas gift bag, full instructions and images to help. The inside uses a cardboard tube from a toilet or kitchen roll. The bag has eyelets for you to add ribbon or cord for a drawstring to hang. Ideal for a small gift, chocolates or just to hang as decoration.
You could also knit a number of these and make them into advent bags. See the images for ideas. There are many patterns for chocolate orange covers and some are really cool but its a matter of opinion if you like what’s inside ?! So this is a gift bag to personalise the contents for yourself or a recipient.

 |
 |
 |
You will need to know how to change colours and carry the yarn up the side of the knitting, there are no charts as I have written out the pattern for you to follow row by row. Use ribbon, thread, knit or crochet cords to tie and hang. You need 2 colours to follow the pattern, it is shown using DK yarn and 3.5mm knitting needles – Finished sizes are Height 11cm/4.5inches – width 5cm/2inches – height for storage inside is 8cm/3.25inches. Cardboard tube used is 4.5cm diameter and cut to 7cm (just under 3 inches) long, ones shown used the inside tube from a toilet paper roll. The eyelet row is made using (yf,K1,Sl1,psso)Yarn forward, Knit1,Slip1, Pass slip stich over. I have including images to help or search for this method if unsure. If this row is the one that puts you off then my suggestion is don’t make it with eyelets and just pull up the top with ribbon around the outside. To do this option just replace the eyelet row with a Knit row.
© copyright cooldenim.co.uk 2024 designer: creativeneats; all rights reserved.
Not to shared or distributed without express consent.
Materials:
Small amount of Dk yarn in 2 colours (less than 10g each), Ribbon or Cord, cardboard tube (toilet roll), scissors and needle.
Abbreviations:
K – Knit/ P- Purl/ (yf , Sl1 , K1, psso) = yarn forward/ slip 1 stitch knitwise/ psso – pass slipped stitch over the knitted stitch
Pattern and Instructions
In white cast on 45 sts
2. Purl row
3. Purl row
4. Join Red knit row
5. Purl row
6. Knit row
7. Purl row
8. Knit row
9. Purl row
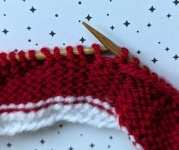
10. eyelet row K2, (* yf ,Sl1,K1,psso), K2 (*) K3 (*) k2(*) K2 (*) k3 (*) K2 (*) K2 (*) K3 (*) K2 (*) K2
11. Purl row ( the yarn overs are stitches so purl as normal – 45 sts
 |
 |
 |
 |
| Row10: Bring the yarn forward | Slip the next st knitwise then K1 | Pass the slipped st over the K1 | Completed yf,sl1,k1,psso |
 |
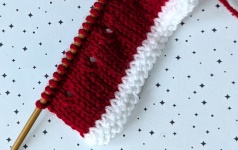 |
| Row 11: On the return purl the yarn overs as a normal stitch | You have eyelets from the right side |
12. Knit row
13. Purl row
14. Join white and Knit row
15. (P1, K1 ) repeat ends P1
16. (K1, P1 ) repeat ends K1
17. (K1, P1 ) rep ends K 1
18. (P1, K 1 ) rep ends P1
19. ( P1,P2tog ) rep x 15 (30)
20. In red Knit row
21. Purl row
22. In white Knit row
23. Purl row
24. In red Knit row
25. Purl row
26. In white Knit row
27. Purl row
28. With white and red ( K1 white, K 1 red ) across the row
29. In white Purl row
30. In white Knit row
31. With white and red ( P1 white, P1 red ) across the row
32. In white Knit row
33. Purl row
34. In red Knit row
35. Purl row
36. In white Knit row
37. Purl row
38. In red Knit row
39 . Purl row
40. (K2tog) rep across (1 5)
41. (P2tog ) rep across purl the last stitch (8)
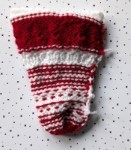
42. Pull through remaining sts firmly and fasten off.
Turn right sides together and sew a seam matching the stripes as you go.
Turn right way out.
Cut cardboard tube (toilet roll) to be approx. 7cm (just under 3 inches)
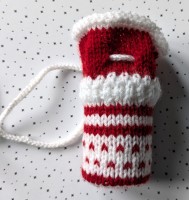
Push the tube into the inside of the knitting (you may find it easier to peel it down and pull the sides around it so as not to snag the knitting). Thread the eyelet holes with your chosen material.
 |
 |
 |
 |
| Pull through last stitches tightly, sew a seam matching the stripes. | Cut a tube approx. 7cm (cardboard tube used from inside toilet/kitchen roll) | Put the tube inside the knitted pouch pushing into the base. | The base will look like this. |
 |
 |
 |
| Bag before threading cord/ribbon | Thread cord/ribbon through the eyelets. | Tie and hang. |
To use as an advent bag, attach a number tag to the ribbon or cord.
Copyright @ cooldenim.co.uk 2024; all rights reserved.
Not to be shared without express permission from cooldenim. Pattern or knitted items as a result of this pattern not to be sold or distributed.
